The IP addresses that are seen in the sandbox are private IPs that are accessible only from within. You could still connect to all resources (through SSH/RDPa) from the Cloud CCL Web UI. However, if you would like to access them from outside the platform, say through a SSH client or a Remote-Desktop software, you would need the public IP addresses/ports of the resources - which you can get by following the below steps:
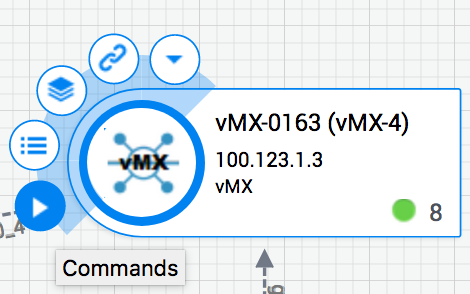
a. Open the sandbox that you've built and select 'COMMANDS' from the 'Window' menu
![]()
b. Under 'Managed Allowed Network Prefixes', run 'Add Allowed Network Prefixes' or 'Replace Allowed Network prefixes' depending on what you would like to do - former command for adding to the already existing network-prefixes, and the latter for replacing the existing list of allowed prefixes with the current one.
c. Key-in the IP address(es) that you would like to be added in the 'allowed prefixes', and hit 'Run'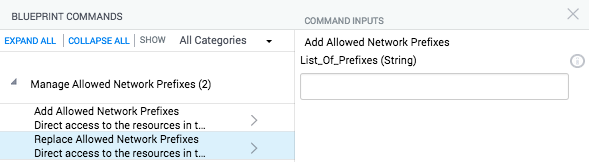
d. You'll be sent an automated email - after the successful execution of this command - that will have details of the public-ip/ports of all your resources in the topology
Note:
a. If you would like to access HTTP URL from Cloud-CCL (say, from AutomationVM), you would need to follow the above steps to 'add your ip-prefixes to the sandbox' . SSH & RDP doesn't mandate this.
b. You can get your IP address by searching for 'What is my IP' in any internet-search-engine
Cloud CCL is completely firewalled away from the corporate network and your topology is only seen from a ‘system-capacity management’ & ‘SKU purchase-order’ point-of-view. Your data is never shared with anyone inside or outside of Juniper, and it will be deleted from our systems as soon as your subscription ends.
This is based on the SKU that you purchase. Please contact your Juniper Networks account manager for more information on the SKUs that we have setup
You can set your time zone by following the below steps:
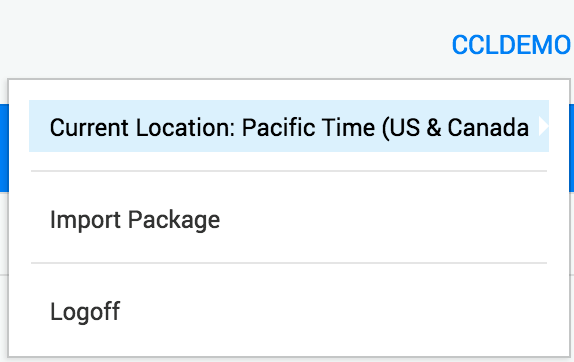
a. Login to Cloud-CCL portal & click on your name (right-hand top corner)
b. The current time-zone that’s being used shows up.
c. Select the desired time-zone by clicking the arrow-button next to it.
Once you've selected your time-zone, any reservations you make will be based on this time-zone.
Note: If you clear your browser cache, this setting will get reset to UTC!
This feature is currently unsupported by the Cloud CCL command and control system. You can use other terminal tools in concurrent with your Cloud CCL session to access the CLI of each reserved system with full functionality.
We’ve tested Cloud-CCL in Windows/Mac using these browsers: IE11, Chrome 63+. We’ll continue to test newer releases of these browsers as & when they arrive.
If you have modified/removed any interface links after the sandbox is built, please run 'Update Connections' from the 'Commands' menu
Please refer to the ‘resources’ page for more details on this.
This is based on the SKU that you purchase. The following SKUs have been set up to ease the ordering process. Please contact your Juniper Networks account manager for additional information.

You can backup the configurations - onto the GIT server - by using our automation-script in CCL-AutomationVM's 'Cloud CCL Orchestrator'. Please follow the below steps to configure & execute it:
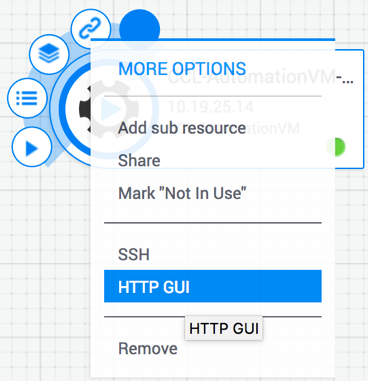
a. Hover over ‘CCL-AutomationVM’ resource in your topology & launch Cloud-CCL Orchestrator by selecting options > HTTP GUI
b. Once 'Cloud-CCL orchestrator' is launched in the browser, login using the credentials given to you.
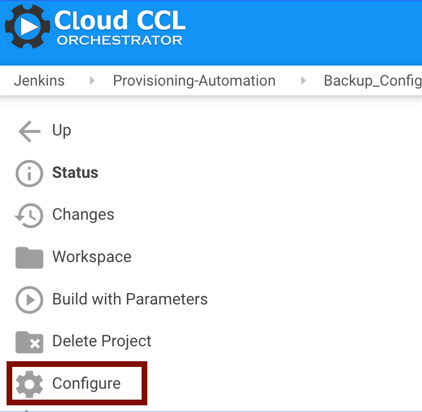
c. Navigate into ‘Provisioning-Automation’ > ‘Backup_Config’ job & select ‘Configure’ in the LHS (as shown below):
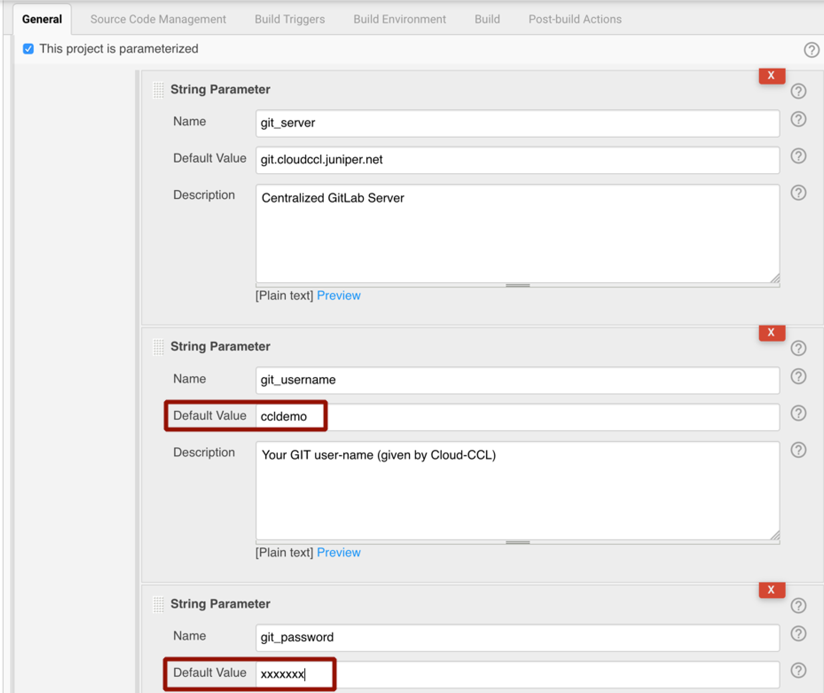
d. In ‘General’ setting, provide your GIT user-name & password in the corresponding parameter fields (as shown below) & ‘save’ it.
e. If you prefer to setup a schedule for having this job run automatically, navigate to 'Build Triggers' setting and select the checkbox 'Build Periodically'. This opens up a text-area, where you can provide this value: 0 0 * * *. The job would then run automatically at 12 AM Server-Time (PST).
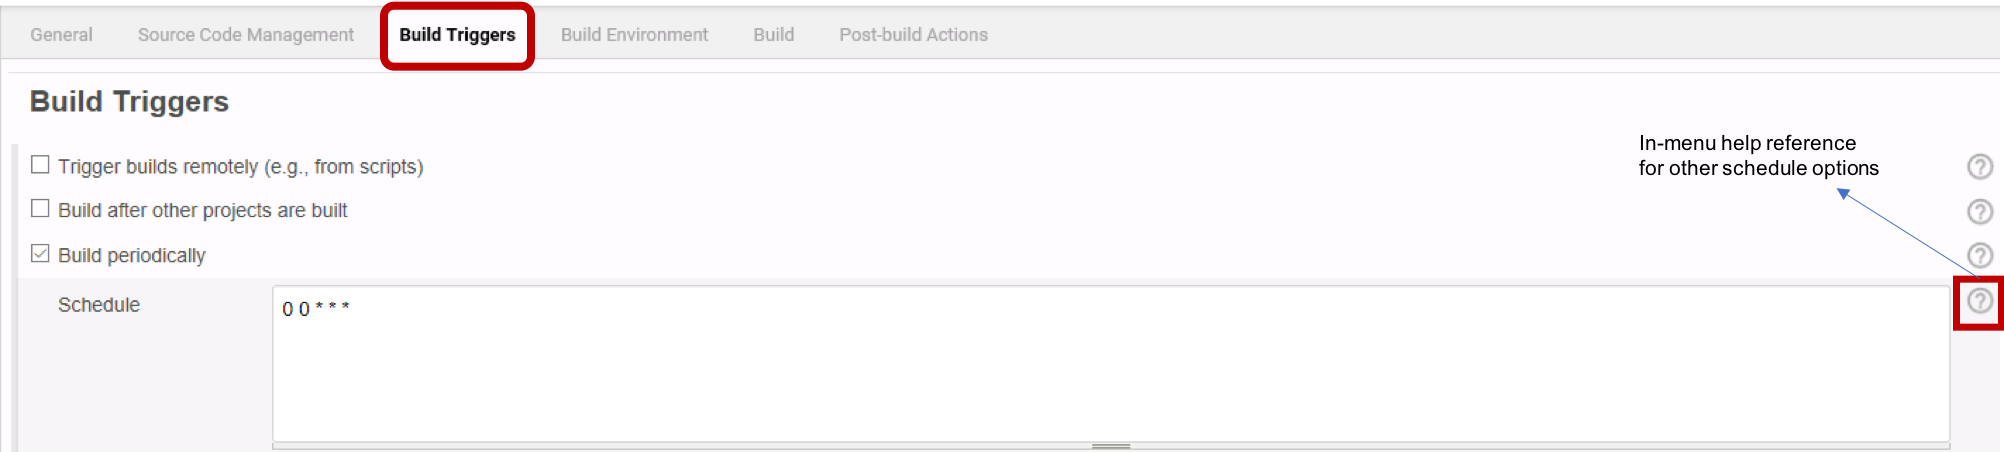
Alternatively, if you want to, say, run this job everyday at 12 AM London time, specify a value like this:
TZ=Europe/London
0 0 * * *
For more such schedule options, you can refer to the 'in-menu help reference' provided.
f. Save the changes that you've made above, upon which, this job would run at the specified time and backs up all your configurations onto the GIT server automatically (these configurations will be stored in the 'config-backup' GIT project as '.tgz' files).
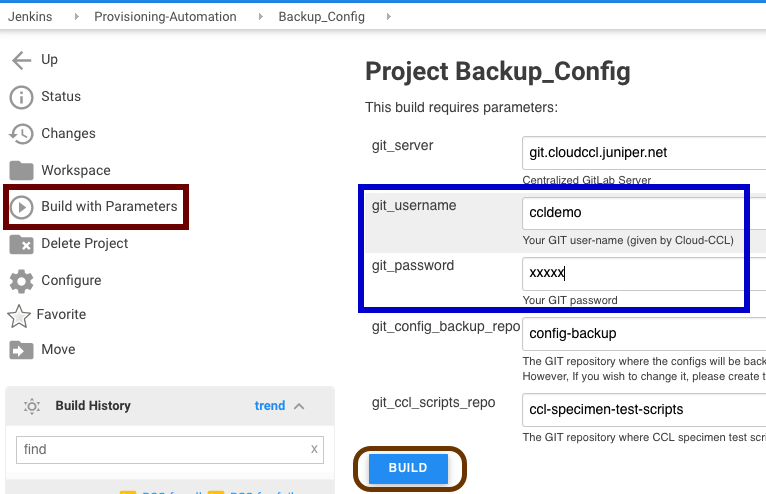
g. If you would like to run this job on-demand, choose 'Build with Parameters' from LHS panel and hit 'Build' (all the parameters that this job require will be auto-populated)
Yes, this is possible for vMX & vSRX. If you've CCL-AutomationVM in your topology, please access 'Cloud-CCL Orchestrator' GUI and execute ‘install_junos’ job (under ‘Provisioning Automation’ folder), providing the necessary parameters like version, package details etc. Please note however that, for vMX, we support Junos 17.x+ releases only and not older.
Please refer to the ‘resources’ page for more details on this.
When you build your topology, make sure you include ‘CCL-AutomationVM’ & ‘CCL-Git-Server’ resources. Alternatively, you could choose '[Automation-Template]' for creating your blueprint.
CCL-AutomationVM has automation framework & Cloud-CCL Orchestrator pre-installed that helps you in junos provisioning & test automation. It also comes with basic test-scripts package that you can utilize and/or export/import scripts from/to this environment to/from production.
For more information, please refer to ‘resources’ page.
For accessing the CCLAutomationVM's HTTP URL (aka Cloud CCL Orchestrator) you are required to add your system's ip-address / prefixes onto the sandbox. Please follow the steps mentioned in 'FAQ<1>' above, after which you will be able to access the HTTP URL without issues. You could still SSH/RDP to your resources.
- Performance testing (Cloud-CCL is meant for functional and not capacity testing)
- Link protocols like LACP, LLDP
- LAG or AE (Aggregated-ethernet interfaces)
- VLAN tagged frames with TPID 0x8100. It will work with a different TPID (for e.g. 0x9101)
- Adding a resource into a live topology (aka sandbox / topology that's built). We however support adding new interface links/connections after a topology is built.
Workaround for VLAN Tagging:
VLAN Tagging should work with a different TPID than 0x8100. Following is a sample config from a vMX where VLAN tagging works fine:
jcluser@vMX-addr-1> show configuration interfaces | display set
set interfaces ge-0/0/0 flexible-vlan-tagging
set interfaces ge-0/0/0 gigether-options ethernet-switch-profile tag-protocol-id 0x9100
set interfaces ge-0/0/0 unit 100 vlan-tags outer 0x9100.100
set interfaces ge-0/0/0 unit 100 family inet address 192.85.1.2/24
set interfaces ge-0/0/0 unit 101 vlan-tags outer 0x9100.101
set interfaces ge-0/0/0 unit 101 family inet address 192.85.2.2/24
set interfaces ge-0/0/1 vlan-tagging
set interfaces ge-0/0/1 gigether-options ethernet-switch-profile tag-protocol-id 0x9101
set interfaces ge-0/0/1 unit 15 vlan-tags outer 0x9101.15
set interfaces ge-0/0/1 unit 15 family inet address 10.9.0.9/31
set interfaces ge-0/0/1 unit 15 family mpls
For your convenience, we've provided the following templates. You could choose any of these, based on the requirement:
a. CCL-Automation-Template: If you choose this, topology editor will be pre-populated with 'CCL-GitServer' & 'CCLAutomationVM' resources, that are needed for enabling automation. You can build your other resources on top of these.
b. CCL-Empty-Template: If you want to build your own topology by dragging-and-dropping the VNFs onto the canvas, you can choose this.
c. CCL-IXIA-Template: Choose this if you wish to use vIXIA in your topology. This includes 'Automation-Template' resources and 2 vMXs, 2 IXIA ports, 1 IXIA-GUI. You can duplicate IXIA ports & vMXs or add any other VNFs based on your requirement. IXIA-GUI need not be duplicated.
d. CCL-Spirent-Template: If you want to use vSpirent in your topology, choose this template. This includes 'Automation-Template' resources and 2 vMXs, 2 Spirent ports, 1 Spirent-GUI & 1 SpirentLabServer. You can duplicate Spirent ports & vMXs or add other VNFs based on your requirement. Spirent-GUI & SpirentLabServer need not be duplicated.
e. CCL-25-vMX-Template: If you are required to create a topology with a large no. of vMXs (25 or more), you don't need to drag-and-drop each one of them. Instead, you could choose this template and add other VNFs based on your requirement. Please note that all of these 25 vMXs are connected in a ladder-fashion (vMX1->vMX2->vMX3 etc)
For accessing console of a resource, you need to generate a token. This is done for security purposes. Please follow the below steps to generate the token:
1. Hover over the resource for which you want to access the console.
2. Click on 'Commands' menu
3. Under 'Get VM Console URL' section, execute 'Generate VM Console access' command.

4. As soon the command completes, you can access the console from options menu.
However, please note that this token is valid only for one-time (console) access. If you would like to access it again, please follow the above steps to generate the token again.
Please contact us at cloud-ccl-assist@juniper.net for any concerns/queries and we’ll be happy to support you.